Showing posts with label back pain. Show all posts

Thursday, October 31, 2013

Late-Onset Scoliosis is Common in Older Adults

by Nina
Reclining Nude, back by Henri Matisse
A recent New Times article Scoliosis Can Hit Well Past Adolescence by Jane Brody confirmed something I have been observing in the yoga community: late-onset scoliosis is quite common in older people. I developed the problem myself in my fifties, so I’m quite aware of the condition, and I’ve noticed a large number of other older yoga practitioners with the same problem. Here’s what Jane Brody said about this:

"Although scoliosis is generally thought of as a problem of adolescents, who often require bracing or surgery to correct the curvature, the condition is actually far more prevalent in older adults. In a study by orthopedists at Maimonides Medical Center in Brooklyn of 75 healthy volunteers older than age 60, fully 68 percent had spinal deformities that met the definition of scoliosis: a curvature deviating from the vertical by more than 10 degrees.
"

Even a mild version of scoliosis can result in chronic pain of different types. While your pain could be in your back, it might also be in your hip (because scoliosis can make your hips uneven) or even your leg and/or knee (because scoliosis can make one leg “virtually” shorter than the because that hip is higher).

Baxter, who teachers Yoga for Back Care, has already written about scoliosis (see Friday Q&A: Scoliosis). But I decided to write about it today because I think it’s important for us all—students and teachers alike—to realize what a common problem this is. And if you (or a student of yours) are having mysterious back pain, hip pain, or leg pain, it’s worth being checked out to see if this is causing the problem. Some people just don’t think of it! I personally know of two cases of women with pain who didn’t realize they had scoliosis. In one case, the yoga student’s teacher casually mentioned, well, of course, you have scoliosis, because it was visible to his sharp eyes. She had no idea! And in another case, it was I myself who noticed it while I was assisting a fellow student doing a backbend. I just asked her, “Do you have scoliosis?” She was surprised I had asked, but we when talked afterward, it turned out she was having quite a lot of pain, including in her hip. So I encouraged her to get checked out by a health professional, and sure enough, she did have scoliosis.

Getting checked out is not necessarily a big deal. A health professional can do a visual test that is quite simple (he or she will watch your spine as you come bend into a forward bend), although in same cases, if your scoliosis is very mild, you may need an X-ray to detect it. But it is worth knowing the source of your physical problems because, yes, yoga can help. Even Jane Brody had a yoga pose recommended to help her:

Determined to minimize further shrinkage and to avoid pain and nerve damage, I consulted a physiatrist who, after reviewing X-rays of my misshapen spine, said the muscles on my right side, where the spinal protrusion is, were overdeveloped relative to the left. He prescribed a yoga exercise — a side plank — to strengthen the muscles on the left and exert enough of a tug on my spine to keep it from protruding farther to the right. He suggested that the exercise might even straighten the curve somewhat.

That pose sounds like Vasisthasana (aka Side Plank pose) to me! And there are whole lot of other yoga poses you can do to strengthen your back and balance your curve. So if you’ve been diagnosed with this condition, seek out a yoga for back care teacher who understands scoliosis, take a Yoga for Scoliosis workshop, or check out Elise Browning Miller’s web site (she’s a long-time yoga teacher who uses yoga to manage her own scoliosis) for info on her books and DVD and other resources.

Tuesday, July 23, 2013

Yoga Better than Injections for Low Back Pain

by Baxter

A July 18th New York Times blog post entitled Alternatives for Back Pain Relief surprised me when it proclaimed that a modern and widely used treatment method for low back pain is no longer considered effective, especially for chronic or long-standing low back pain. That treatment is the use of injections into the areas of pain. The injections usually contain the inflammation-decreasing drug cortisone, but can also have ingredients like morphine, ibuprofen and vitamin B12 in the mix. Over the years I have had many patients come to me with low back pain, and from their reports, the effectiveness of the injections never seemed particularly strong. For some patients with new acute low back pain, who experienced more serious signs and symptoms, like radiating pain to the leg or actual weakness, the injections more often seemed to provide some temporary pain relief.

However, several new studies have revealed that, when looking back at those patients treated with injections, the injections were not significantly more effective than no treatment at all. And one study indicated that those who did not get injections for a pinched nerve in the lower back fared better down the road than the patients who received an injection course.  In the commentary published in a recent issue of JAMA:

“Based on the available data, the JAMA authors conclude, doctors “should not” recommend injection therapy to their patients with chronic low back pain.” 

That may be a hard pill for some doctors to swallow, as there has been a steady increase in the use of injections for low back pain, mainly because it is relatively inexpensive, can be done as an outpatient in the office, has fewer risks compared to surgery, and makes the docs some bling. The possible one positive use of injections is that is does often provide some temporary relief of low back pain symptoms.

The New York Times post then went on to reference a recent systematic review of yoga for low back pain that we reported on here early this year. This study looked back at all of the best designed studies on the subject and concluded that there was “strong evidence of short term effectiveness of yoga for low back pain and moderate evidence of long-term effectiveness of yoga.”

But although the New York Times post mentions the clear benefit of yoga for short-term back pain, it does not emphasize the second claim that the study discovered: moderate evidence for yoga's help over the long term. I took another look at the study itself, and discovered an important caveat: the authors would only recommend Viniyoga style practice for long-term benefits, as the other yoga methods studied did not demonstrate the same benefits. As they state:

"The American Pain Society's guidelines recommend that clinicians consider offering yoga to patients with chronic LBP (lower back pain). However, this recommendation is limited to Viniyoga-style yoga as the net benefits for other yoga styles could not be estimated."

Now, I love Viniyoga and integrate its methods into my own practice and teachings, along with the wisdom of the Iyengar method and some other modern yoga styles I’ve learned over the years as well. But I suspect that some of the alignment-strong styles, like the Iyengar method, will prove to be helpful in the long run as well, but we will need better studies to bear that out. That said, for those who are not familiar with Viniyoga (a term coined by American yoga teacher Gary Kraftsow for the yoga he learned from T. Krishnamacharya and TKV Desikachar) I would recommend to you two books to learn more:
  1. The Heart of Yoga by TKV Desikachar
  2. Yoga for Wellness by Gary Kraftsow
For now, this is all good news for those of us dedicated to our practice. As one of my students said to me just this morning after class, it's his regular yoga class that keeps his back in the best shape over time since he first developed low back pain many years ago. I’d love to hear back from our readers about your experiences with yoga for low back pain, so send me your story!

And don’t forget, my live webinar on Yoga for Healthy Digestion starts today, Tuesday July 23, 2013 on Yoga U online! Click here to learn more about it and sign up to join me Tuesday and Thursday from  8:30 EST (5:30 PST).

Monday, July 22, 2013

Unclear on the Concept: Yoga as a Treatment

by Nina

Wet Handle Bars by Melina Meza
“A comprehensive review published in May in The Clinical Journal of Pain finds that there is “strong evidence for short-term effectiveness” of yoga against back pain, although whether the benefits last beyond a year is less certain.” — Gretchen Reynolds, NY Times Sunday Magazine

In this Sunday’s New York Times Magazine, there was a short article called “Spinal Trap,”
about alternatives for treating back pain. The subtitle was “How do you solve back pain? Don’t ask your doctor.” We’ve already heard from Baxter on this topic, when he confessed that he had little to offer his patients when he himself was a family doctor (see For the Young and Old: Back Care). And you’ll be hearing from him soon about the comprehensive review mentioned in the quote above.

For now, I’d just like to rant a bit about the second half of the sentence:

“strong evidence for short-term effectiveness” of yoga against back pain, although whether the benefits last beyond a year is less certain


At first, I was just confused. What does she mean it is less certain whether the benefits last beyond a year or not. If you’re doing yoga for your back pain and it helps your back pain, why wouldn’t it continue to help your back pain for as long as you kept practicing? But Brad pointed out to me the underlying confusion in this statement. He said, “She’s thinking about yoga like physical therapy. In other words, it’s like a “treatment” you get from the doctor, something you’d do for a couple of months to “cure” your back pain, but then when you felt better you’d stop the treatment. And then maybe the pain would come back eventually.”

Ah, so that's what she meant. But how completely unclear on the concept is that? Naturally, if something in your life is causing you back pain, whether it’s your posture at your desk or in your car, standing all day at your job, too much gardening, lifting your children, lack of exercise in general, stiffness in certain areas of your body, lack of strength in certain areas of your body, you can’t just go back to your old way of life and expect the results of a short session of yoga classes to see you through the rest of your life. That would be like thinking you could do a few months of weight training to get stronger, and then expecting that would keep you stronger for years to come.

Brad laughed and said, “Yeah, and it’s not like there’s a “cure” for aging.”

So, yes, we’re afraid that whether you are practicing yoga for back pain or another condition, or just, you know, for healthy aging in general, it’s going to require an ongoing commitment. But it’s free, has no unpleasant side effects, and oh, yeah, it actually works.

Tuesday, January 22, 2013

Degenerative Disk Disease and Yoga

by Baxter

In my ongoing attempts to stay up on the developing information about yoga, aging and health, I look at other online sources of new information. One such resource is the online site called Yoga U, which sends out a periodic newsletter as well as offering special live interactive webinars on a variety of topics and yoga. (I’ll be doing a webinar for them in May on “Yoga and the Digestive System” so stay tuned!) As I was preparing for my Sunday session at Yoga Journal Conference last week “Yoga for Arthritis,” I came across a piece on Yoga U about a recent study that looked at degenerative disc disease

Degenerative disc disease is a process of change to the cushion-like discs found between the vertebrae or spinal bones. It most commonly affects the discs in the neck/cervical region and the lumber/lower back region. There is some ongoing debate on whether the deterioration of the discs is a natural part of the aging process (since it is seen in people without symptoms of back or neck pain in gradually increasing percentages as we age) or whether it is directly related to an abnormal condition of change in the discs. It is really part of the general wear and tear arthritic changes we see in other joints, as the discs represent a unique kind of cushion structure that is similar to the cartilage caps found on the ends of other bones in major joints of movement. But it is different from the regular cartilage in other joints in that it is a larger structure, not adherent to the vertebrae above and below it, as well as having a unique structure that distributes the intense force of gravity that travels down the spine in a specialized way.
Spinal Vertebrae and Discs
Despite our uncertainty as to a direct correlation between the presence of degenerative disc disease and back and neck pain, I have LOTS of patients and students who have both situations present together. So if I knew of something to offer them that could decrease the development of degenerative disc disease, I would be hopeful it would also reduce their chances of pain as well. The study discussed on Yoga U,  which was originally published in the European Health Journal, March 2011, compared the spines of long time yoga teachers, via MRI imaging, to those of a matched group who did not do yoga. Lo and behold, the yoga teachers, who had been teaching for at least 10 years, had significantly less degenerative disc disease.

The study, done in Taiwan, looked at yoga teachers that practiced a gentle and slow form of yoga. I found this quite compelling, since much of the yoga we recommend here at YFHA is somewhat gentle, and we always recommend moving mindfully into and out of poses. Those of our readers who practice similarly could benefit from this style of practice in regards to their spinal health. The researchers matched the yoga teachers and the control group for age, sex, general health and all were non-smokers. (Why non-smokers, you might ask? Smoking is considered a risk factor on its own for increased chance of back pain.) Even though yoga teachers had less degenerative disk disease in all areas of the spine compared to the control group, within the teachers themselves there was less degenerative disk disease in the cervical spine versus the lumbar spine. Finally, the researchers concluded that their results suggest that hatha yoga may have slowed the natural aging process in the discs.

They hypothesized that a combination of factors, such as stretching and positioning of the spine, as well as decreased weight-bearing on the spine while practicing yoga, may allow for more nutrients to diffuse or enter the spinal discs. Whatever the reasons, these are surely encouraging results! However, as always with these initial studies, this early evidence warrants further studies with larger groups of people. In the meantime, I am going to continue with my gentle, slow yoga, with the intention that my discs are benefiting every day. Won’t you join me?

Wednesday, May 9, 2012

Arthritis of the Spine, Part 2

by Nina

With Baxter’s blessing, I’d like to add my two cents to his post yesterday on Arthritis of the Spine. You see, he forgot to mention hanging upside down! Yes, there is a whole group of poses that can provide great relief to those of you with arthritis of the spine (as well as other types of back pain), where you hang upside down and allow gravity to lengthen your spinal muscles and create space between your vertebral discs. You can use these poses at any time for relief from back pain and to help maintain the health of your spine. You can also use them to lengthen your spine at the beginning of a yoga practice.

Caution: If you are experiencing acute pain and your muscles are contracting, before hanging in an inverted pose, it is a good idea to start by relaxing and releasing your muscles in supine or prone poses.

If you’ve ever been in an Iyengar studio that has wall ropes, you may have seen people hanging upside down on the ropes with their legs in Cobbler’s pose. If you don’t know what I’m talking about, you can take a look at this the first pose in this video:
Other yoga studios have a yoga horse that you can hang from. Most of us can tell intuitively, just by looking at these hanging poses, just how good our backs would feel in them (kind of like looking at a recipe and being able to tell how good the dish would taste). And both these hanging poses, along with other variations, are excellent options for you if you have access to the appropriate props. So definitely try them out sometime in your local yoga studio. But what if you do yoga somewhere that doesn’t have these special props? And what can you do when you’re on your own at home? 

One good possibility is doing Downward-Facing Dog pose with a strap and a doornob, as shown in the photo below (taken from Back Care Basics by Mary Pullig Schatz, M.D.). Having the strap support you in the pose takes the weight off your arms and shoulders so you can just relax in the pose and let gravity do its magic.
 
Here's how to do it:
  1. Find a door with a knob that is sturdy enough to support your weight.
  2. Take a rope or yoga strap and make it into a loop.
  3. Open the door half way, and hook the loop over both sides of the doorknob.
  4. Step inside the loop and place the strap or rope at the tops of your thighs, at the point where your hips bend when you bend forward.
  5. Lean forward into the rope until it supports your weight, bend forward and place your hands on the floor.
  6. Using your hands to stabilize yourself, walk your feet back into Downward-Facing Dog position, with one foot on each side of the door.
Stay in the pose for several minutes, keeping your arms extended and your legs active. To come out of the pose, walk your feet forward out of Dog pose, then bend your knees and slowly roll up to standing.

Another possibility is lying on a table, with your legs on the table and your torso hanging off the edge, as shown in this photo (also taken from Back Care Basics by Mary Pullig Schatz, M.D.). For this one, you’ll need help from a partner. You will also need to do some experimenting to see whether the table is high enough for you to hang from without your arms touching the floor. If it isn’t, place a folded blanket or a stack of folded blankets on the surface of the table, as shown in the photo.

Here's how to do it:
  1. Place a chair about one foot from the table, with the seat facing the table.
  2. If you are not using blankets on the table, fold a sticky mat and place it over the edge of the table, to create a softer surface over which to bend.
  3. Sit on the table and then use your arms to bring yourself to a side-lying position.
  4. From your side-lying position, roll onto your belly and scoot yourself to the edge of the table.
  5. Have your partner hold your thighs or calves as you hold onto the chair seat and gradually move your torso off the table until the tops of your thighs are supported by the edge of the table.
  6. When you are in the full position, fold your arms overhead so you can hang comfortably (your head and arms should not be touching the floor). Stay in the pose for several minutes, as long as you are comfortable.
To come out of the pose, bring your hands to the floor to support you as your partner releases your legs and comes around to support the chair for you. Then, place your hands on the chair for support. Slide your legs toward the side edge of the table. Then slowly put one foot down on the floor, then the other. Use your hands on the table to help you come up.

Do let us know if you try any of these poses! We'd love to know if they provide you with any relief.


Tuesday, May 8, 2012

Arthritis of the Spine

by Baxter

Be it lower back, middle back, upper back or neck pain, not a day goes by when at least one student offers up his or her particular version of back pain. Due to the effects of time, age and stress on the spine, one of the underlying causes of back pain is arthritis of the spine. To be more specific, we usually refer to it as “osteoarthritis of the spine” to differentiate it from other types of arthritis that may be due to autoimmune conditions.  Sounds specific, maybe even helpful to have a label to attach to one’s problem, but what does “arthritis” refer to? Well, it is an “itis,” so there’s a clue. "Itis" usually implies some inflammatory process, you know, like tendonitis, where the tendon is inflamed.

In arthritis, it is the boney structures and their coverings, usually cartilage, that are involved. In a healthy joint, anywhere in the body, the ends of two bones that make up a joint are covered with a protective coating of connective tissue known as cartilage, which acts as both a cushion between the two bones, and as a smooth, slippery surface that can slide and glide as the bones move over one another during motion. Here’s where time, age, stress and other factors ruin a perfectly good system.  Over time, with the aging process (which can dry out and thin the cartilage independent of the other factors), and with certain movement patterns (especially unusual, misaligned ones) and repetitive use, especially with additional stress from gravity or carrying loads, the cartilage can fray and thin and outright wear away. This exposes bare bone, which is not that smooth and slippery, and leads to the “itis” or inflammatory process we feel as “arthritis” via the symptoms of stiffness, immobility and pain.
Whale Bone by Michele Macartney-Filgate
When talking about the spine specifically, the places where two spinal bones, or vertebrae, meet include the donut-like intervertebral discs (which I will refer to as discs from now on), which sit between two adjacent “bodies” of the vertebral bones, in vertical relationship, and the two posterior facet joints, right and left, whose smaller surfaces are covered by a thin coating of cartilage. The most common area for arthritis in the spine is in the lowest part of the lower back, or lumbar region, due to extra effects from gravity of holding up the belly, torso, head and arms. The next most common area is the neck area or cervical spine, likely due to its incredible mobility and relatively short intervertebral discs. The thoracic area or rib cage region of the spine is often affected when two other complicating factors are present: scoliosis, or curvature of the spine, and osteoporosis, or thinning of the bones. I’m sure there will be more on those topics at another time.

Coming back to the discs for a minute, all the cumulative factors mentioned above can cause these guys to lose their normal integrity, resulting in the discs losing water and drying out, which increases the risk of them breaking open or rupturing their tougher outer ring known as the annulus fibrosis (even sounds tough!) and extruding or pushing out their inner contents, which is the gel-like inner part, the nucleus pulposa, often compared to the jelly in a jelly-filled donut. The discs also lose some of their height, which normally helps to keep a healthy distance between two vertebrae. This can then result in the facets rubbing more closely together, the opening for nerves narrowing enough to start pinching on nerves, and other such difficulties! When that nucleus pulposus material is released into the spinal canal, which sits just back of the discs and where your spinal cord descends down from the brain to the tail bone, it causes a local flare of inflammation that can last a while. When the disc is losing height but does not rupture, we call that degenerative disc disease (a bit of a misnomer, as it may not be a disease per se, but more like a natural aging process of the disc). This alone can result in pain for some, and it can be found in adults starting in their thirties!

How’s yoga supposed to improve this arthritis situation of the spine? Well, those of you who have been in class with me lately have heard me use the phrase “the prime directive.”  Sounds a bit Star Trek-y doesn’t it?  But in this setting, it refers to the inner action of creating an even lift from the base of the body, either the tailbone or the sitting bones, up through the whole length of the spine to the crown of the head. This is technically known as axial extension, and, according to Leslie Kaminoff, it does create a longer spine, even as it slightly diminishes the amount of natural arch in each region of the spine. That is, it straightens the spine a bit, but not entirely.  And it requires some muscular effort, especially if you have not been practicing it. You can do this anywhere, anytime, and if you are doing it and paying attention to how it feels as well as, perhaps, how it affects your breath, and you remain connected to the action for a bit, you have a mini yoga practice under way. 

And then from there, you can take the spine through some gentle range of motions, via some easy, basic yoga poses, such as Cat/Cow pose, Child’s pose to low Cobra pose, Standing Side Bend (sometimes called New Moon pose), and gentle reclining or seated twists. As you do this, you are always assessing the effect on the area of your spine that is sensitive, modifying the intensity, range of motion or number of repetitions or length of holding to make it appropriate for you situation. I believe that a while back Shari mentioned that movement actually hydrates, nourishes and revitalizes the discs of the spine, so inactivity is not a great option, is it? (See Yoga for Osteoarthritis for an interview with Shari about arthritis.).  So let’s get moving, yogis!  Great to be back from spring break. More good stuff tomorrow! See Arthritis of the Spine, Part 2 for more poses you can do to find relief from back pain and to lengthen your spine.

Thursday, March 1, 2012

Featured Pose: Simple Chair Backbend

by Baxter and Nina

Another one of our five essential office yoga poses, the simple chair backbend is the perfect antidote to the typical postural habits of slumping forward that we develop from sitting all day at our desks, in cars, and airplanes, and from the many everyday activities where we are bending forward, such as gardening or washing dishes.

The basic back-bending shape re-establishes the natural curve of your lower back, correctly aligning your spine in its natural curves, which helps to keep your back healthy. The backbend also lengthens the front of your body, allowing many of us to breath in with greater ease. It helps release stress from your upper body, especially the upper chest. And while stretching the front of your body, the pose strengthens your back body muscles, which tend to be overstretched and weak if they are ignored.

Because backbends in general tend to be uplifting, you may even find this pose helps encourage a more positive mood as you take deep inhalations and exhalations.

The pose can be done almost anywhere. Although a chair without arms is preferable, you can use almost any chair, as long as the back is low enough for you to rest your shoulder blades on.

Baxter prescribes this pose for:

•    Kyphosis of the upper back
•    Chronic lower back pain
•    Head forward syndrome
•    Scoliosis
•    Carpal tunnel syndrome (when symptoms are coming from the shoulders)
•    Sore back from traveling or sitting at your desk
•    Depression
•    General digestive concerns (such as heart burn and acid reflux)

Instructions:
If possible, try to find a chair with a back that touches you near your lower shoulder blades. Then move your chair away from the wall or other furniture so you leave some space behind you.

Next sit on the chair, either it the center (if you’re shorter) or near the back (if you’re taller) so the soles of your feet are flat on the floor. If you’re small, you might need to add some support on the chair seat and/or underneath your feet. Align your feet below your knees, with your thighs parallel to the floor. Now, reach your hands around to grab the lower sides of the chair (where it meets the seat) or, if this is not possible, rest your palms on the back of the chair seat.
Root down through your feet and arms, lengthen up from your tailbone to the crown of your head, and mindfully arch your spine up and back until your upper rib cage touches the chair back and rests there lightly. Keep your chin tucked toward your chest.
If you are very comfortable deeply bending your neck, you can take one or both hands behind your head for support as you allow your neck to follow the backbend of your spine, as shown below.

As you inhale, encourage the lift and arch of your spine. As you exhale, maintain your lift and arch. Continue for four to six breaths, working your way up to 12 to 16 breaths as you become stronger in the pose. Come out with a strong exhalation.

Take a moment to notice how you feel. You should feel stretched, strengthened and alive, not painful and miserable. If you experience any pain afterwards in your neck or back, this backbend variation might not be for you.

Cautions:
Not all forms of low back pain (such as, spondyolisthis, facet arthritis, spinal stenosis or disc herniation) will be helped by the chair backbend, so you have a back condition, check with your doctor before doing this pose. If you have cervical spine or neck issues, be careful with the position of your neck, keeping your chin tucked toward your chest as you go into the backbend. If you have osteoporosis, adding padding to the top edge of the chair so there is less pressure on your spine is recommended.

Monday, February 13, 2012

Interview with Steve Cropley: Relief from Sciatic Pain

Baxter: When we spoke recently, you reminded me of an event that happened to you while attending a week-long retreat lead by JJ Gormley and me.  What was going on with your body that week?

Steve: I suffered low back problems from my high school years on. I routinely jumped off of gas tanker trucks onto concrete in leather-soled moccasins. Today they call that sort of thing “Parcorp”; in the 60s it was called “working for Dad.” My back problems got worse over the years. Years of downhill skiing, running, and working added to the problems. Chiropractors were my only saviors until sciatic pain.

In the spring of 2000, I developed sciatic pain. No relief from chiropractors, acupuncture, massage or physical therapy. I was suffering a pain that generally isn’t felt at its source. In my case, I did feel it from its source in the low back, through the hip and knee, through the ankle, top of my foot, toes and the sole of the foot. I couldn’t sit stand or lie down without constant shooting pains. Thinking that yoga might be part of the problem, I stopped my practice except for Viparita Karani (Legs Up the Wall or Waterfall pose). This pose was the one reliable way to fall asleep; I would plop down anywhere when I needed a break from the pain. I had months of agony before the pain began to recede. I returned to my yoga practice with the occasional recurrence of the sciatic pain, none as severe as the first. 

Baxter: You learned a valuable way of working with lower back pain from JJ that you now share with your students. Can you share it with us here?

Steve: It’s July 2004. I am in a weeklong yoga workshop at the Feathered Pipe Ranch with JJ Gormley and Baxter Bell. This particular afternoon, Baxter is teaching and JJ is assisting students. I can feel the tell tale bite of sciatic pain and I am moving in every direction, except the ones that Baxter is guiding us into, trying to find relief. JJ spots me and I tell her my sciatica was acting up. “Which side?” she asks. JJ shows me how to bring the hip points together with a yoga strap. JJ has me to do symmetrical poses. I did easy down dogs, cat backs, child poses and on my back, knees to chest and easy hip raises. Within a few minutes, the pain was gone. JJ answered the question on my face. “I figured this out on myself. “ She too had fought sciatic pain.

I am 60 now and in my life I have hurt all the major joints, broken fingers and toes, ribs, my jaw and my skull. On occasion, I wake up with low back pain. The difference today: I know that within a few minutes of rising, I will have figured out what it takes to make the pain disappear and get on with my day.

I have taught JJ’s belt trick to a lot of people in the last few years. Building extra press boxes at the 2006 Super Bowl, I found one of our electricians moaning and rolling around on the concrete. This guy had been self medicating, using alcohol to help him cope with his sciatic pain for years. Our 12-hour days and 7-day weeks were taking their toll on him. I taught him JJ’s belt trick, and some simple asana. Within a few minutes, he was able to find relief and go back to work.

This August a student came to class with sciatic bite, my term for that mild or beginning pinch that one gets as sciatica acts up. I taught her JJ’s belt method and she continued class pain free. As class continues, I forget about her earlier sciatic bite and guide her into a twist. She has an immediate reaction as her sciatic bite returns. We go back to JJ’s method, belt and symmetric poses. Pain stops. I haven’t seen this student since Thanksgiving, but I know she has JJ’s belt method in her toolbox, another tool to ease the body and calm the mind.

Here is JJ’s sciatic belt trick/method/remedy. Put the belt around the hips with the buckle on the hip point of the affected body side. Hold the buckle in place as you draw the belt tight. The action is to draw the hip points together.


Baxter, I don’t know why this works. Dr. Patty Tobi and I were talking about this yesterday. Does the pull of the strap or compression from the strap make others nerves fire and make the mind reset the brain’s reading of the enflamed nerves? Patty wonders if the strap puts pressure on a meridian.

Baxter: The belt trick is one I have used for stabilizing the pelvis and opening the sacroiliac joints so they can reset. Sacroiliac joint pain can cause sciatic-like pain patterns. It is hard to say what the belting is doing anatomically, but it very impressive in its effect on stopping back pain.

Steve Cropley is Head Custodian, Santosha Yoga, Sheridan WY, CYT 300 RYT 200. Steve read Light on Yoga in 1971 and determined he was already practicing yoga. He found a teacher and began formally studying yoga in the mid 90’s. Steve began studying with Baxter Bell in 2003, and Baxter introduced Steve to JJ Gormley. Steve graduated from JJ’s Special Ed Yoga program, which he practices to this day. Steve has led impromptu yoga classes in Beijing and Inchon Airport in Seoul. You can find Santosha Yoga at the Santosh Yoga web site.

Wednesday, January 4, 2012

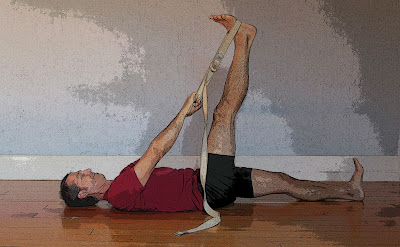
Featured Pose: Reclined Leg Stretch Sequence

by Baxter and Nina

The Reclined Leg Stretch sequence (Supta Padangusthasana) opens your hips and stretches the backs of your legs. It’s a perfect starting pose for just about any practice, as we usually like to start low (on the ground, that is!) and work up to standing poses. But it also works as a great standalone mini practice, providing relief for lower back pain or release of leg muscle tension due to sitting, traveling, or walking. And if you tend to store stress in your body, it’s also a great anti-stress pose after any stressful event or simply at the end of your work day.

The three variations of the pose take you first through forward folding at your hip joint, then, with your top leg out to the side, abduction of the femur, and finally, with your leg across the midline of your body, into a twist, adduction of the femur and rotation of the lower vertebrae of the spine, so you get overall opening of your hips and some twisting, too.

Baxter prescribes this pose for:
  • any musculoskeletal conditions that result in tightness in the hamstrings, hips and lower back
  • chronic back pain
  • general knee conditioning
  • stress relief
Instructions: Start by making a loop with the strap and have it ready off to your right side.
Now recline on your back, bend your right knee into your chest, place the loop over the arch of your right foot and straighten your leg toward the sky. Adjust the size of the loop so your arms can be comfortably straight. Press from both your hips to your heels. Stay in this version one for 14-16 breaths.

For the next variation, keep your bottom leg engaged and take the loop into your right hand and extend your left arm out to the side. Now slowly take your right leg out to the right side of the room until your foot is about 12 inches off the floor. If this feels painful or like too much effort is required to hold your leg in position, place a block or folded blanket under your right thigh for support. Stay for 14-16 breaths and on a exhale return to your leg to vertical.
Finally, take the loop into your left hand and extend your right arm out to the side. Then take your right leg across the midline of your body and over to your left side about 6-12 inches, keeping your lower back and pelvis on the floor.
Stay for 14-16 breaths, then release out of the pose, returning to a symmetrical position, either with legs straight or both knees bent, feet resting on the floor. Take a few moments to feel your body, and then repeat the series on your left side.

Cautions: Don’t pull your top leg aggressively toward your chest (although you can encourage it in that direction) as this could result in a strain to the origin of your hamstrings at your sitting bone, as well as aggravating a lower back condition if your lower back ends up flattening too firmly into the floor.

If you have weak wrists and fingers, you may need to modify the strap by making a loop and hooking your fingers over the loop to hold onto the strap—this makes it much gentler and easier for fingers and wrists.

Thursday, December 1, 2011

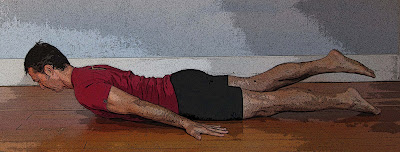
Featured Pose: Locust (Dynamic Version)

by Baxter and Nina

Locust pose (Salabasana) is a simple backbend that strengthens the entire backside of your body, from the nape of your neck to the backs of your heels. Baxter loves this pose because it’s helpful for such a wide range of problems, including lower back pain, postural problems, and weakness anywhere along the chain of your back body, including your , including hips and hamstrings. And because the backbend is shallow and doesn’t put pressure on the wrists, it is accessible to almost everyone.

We’re recommending two versions of this pose: one with your hands on the floor and the other with your arms parallel to floor and hands lifted. The version with your hands on the floor provides more support, making the pose less demanding. The version with arms raised increases the amount of strengthening in your arms and shoulders.

Baxter prescribes this pose for:

•    lower back pain (it strengthens the muscles along the sides of your lower back)
•    hamstring injuries
•    arthritis of the knees (it strengthens the leg muscles)
•    postural problems (such as excessive rounding and head-forward syndrome)
•    arm strength (in the version where you lift your arms)
•    depression (accessible even when your energy is low)
•    general weakness

Instructions: Lie on your belly, with your head resting on the floor, your arms resting at your sides, hands palm down, and your legs stretched evenly back behind you, toes gently pointed. If your lower back feels vulnerable, press your hips gently down to the floor.
Think about your right leg being a bit longer then your left, and on an inhale, lift your right leg up a few inches off the floor without bending your knee knee, while also lifting your head and chest up a few inches. As you lift your chest and head, be careful not to overextend your neck (throwing it back) because this could cause neck strain. If you wish, raise your arms and hands so your arms are parallel to the floor and your palms are facing the floor.


Exhale and release back to the starting position. Repeat the process with your left leg.

Alternate right and left with every round of breath. Do about six times, side to side. Then rest.
Cautions: As with any pose, Locust might aggravate an existing problem or condition. In particular, if you have a pronounced lumbar curve, your back problems could be aggravated. Consult your favorite teacher for an alternative is you have any trouble. If you have asthma or any other breathing difficulties, this pose might make you short of breath. If this happens, come out of the pose and rest.


Monday, November 21, 2011

Featured Pose: Hunting Dog


by Baxter and Nina

This week’s featured pose is one of Baxter’s favorite poses for lower back pain. Hunting Dog pose, which is a great precursor to strong poses like Warrior 3, is a wonderful way to tone and strengthen your upper body, especially the serratus anterior muscles, as well your pelvic stabilizers and core belly muscles. It’s also a good pose for anyone trying to improve core strength as well as strengthening the lower back.

Baxter prescribes this pose for:

  • lower back pain
  • balance issues
  • fatigue (when standing poses are too tiring)
  • improving right/left coordination
  • building arm strength

General Instructions: Start by placing a folded blanket on the floor. Then come into a hands-and-knees position, with your knees on the blanket and your hands on the floor or yoga mat. Keep a neutral curve in your lower back and strong arms.

Next, slowly take your right leg back behind you into a lunge position, with your toes turned under and the ball of your foot on floor. Try to keep your pelvis area and lower back in the starting neutral position at all times—no tip, tuck or turn. 

If you are feeling stable, lift your right leg up until it is about parallel with the floor, but no higher. Again, no change to pelvic alignment!

Finally, consider reaching your arm forward parallel to the floor.

Hold the position for at least 6 breaths, and up to 16 breaths. When you release, shake out your left hand and wrist.  Repeat on the second side.

Cautions: If you are having lower back pain, keep the toes of your straight leg on the ground rather than lifting your leg. If you have wrist pain, bend your elbows and rest your forearms on blocks, rather than putting weight on your hands.

Wednesday, November 2, 2011

For The Young and The Old: Back Care


by Baxter

Back in the day, say 20 years ago or so, when I was a Family doc back in Cincinnati, every day someone came into my office with the problem of low back pain. And if it was your average run-of-the-mill, muscular strain-style back pain, regardless of what I had to offer, things usually got back to normal in about six weeks. However, for the smaller percentage of patients whose pain did not resolve in that time frame, difficulty often lingered for much longer, and there were a myriad of possible underlying causes to account for the situation.

My tools at the time included medications, referrals to physical therapists, and finally consultations with specialists like orthopedic or neurological surgeons. The latter two groups were often interested in offering surgery as a solution, since that was their main “tool” of healing. However, the results rarely matched the billing, and often these same patients would return following a procedure with little or no change in their baseline symptoms.

To say the least, I found myself very frustrated with the repeating scenario I was a part of. What I had to offer did not seem to be very effective; the patients were also frustrated, anxious and worried about what the future held for them. At that time, in my community, hatha yoga was not mainstream, and certainly was not looked upon as a possible therapeutic option for addressing chronic pain of any sort.  Fortunately, the winds of change started blowing at just the right time!
From Yoga: The Poetry of the Body by Rodney Yee with Nina Zolotow
As I began to explore yoga personally and eventually transitioned into teaching and using it therapeutically with my students, it became very clear again and again how helpful yoga practice is in addressing not only the root anatomical, kinesiological issues in back pain, but also in providing prompt benefits for the mental and emotional issues that arise due to chronic pain: anxiety, depression, frustration and disappointment. I suspect that we will return to talk about back pain a lot over the coming weeks, months and years, so today’s post is really an opportunity for me to give you some background thoughts on low back pain and chronic pain in general, with an eye to expanding and addressing more specific issues as we travel along together. Update: See here for further information (and a sequence of poses).

In the meantime, I recommend you read Brad's post from last week (see here). He makes some very important observations regarding the research that has been done to date on this issue, and again reminds us all that ultimately we need to do our own personal study of yoga on our health, sometimes with the caring and expert guidance of our yoga teachers and sometimes on our own.


There are a more and more good books available to all of you out there to get you started on applying hatha yoga techniques to healing your back pain. Now classics are Mary Pullig Schatz, MD’s 1992 Back Care Basics, which is grounded in the Iyengar tradition, and TKV Desikachar’s The Heart of Yoga, which is not specifically a back yoga book but introduces a different and equally powerful method of working with yoga and your body. And if you find yourself in the San Francisco Bay Area, please join me any Monday night at Piedmont Yoga Studio (see here) for my ongoing series of Back Care Yoga. Until the next time, happy backs to you!

Thursday, October 27, 2011

What is a Yoga Practice?


by Brad

A year or so ago I was talking with a colleague about a genomics study he was planning that was going to look at exercise and aging. Previously, he and his colleagues had shown that resistance exercise training had a significant effect on the genes that were transcribed in muscle tissue, and that the older people undergoing this training had gene transcription profiles that resembled much younger people. This time around they were planning a more nuanced study and would look at several exercise regimens, including yoga. I remembered asking him what type of yoga practice they planned to use, and was met with a slightly confused look. He wasn’t sure, but thought it was a “standard practice” involving some stretching and aerobic components. When I inquired further about whether it was Iyengar style or one of those high-energy aerobic practices (like Ashtanga Vinyasa), I realized that our discussion had reached a dead end. He had no idea what I was talking about.

Photo from Yoga: The Poetry of the Body by Yee and Zolotow
So when I ran across another article today on Yoga for Back Pain that was mentioned in the Science Times section of this weeks NY Times (see here), I decided to take a little closer look at what the actual practice was. I also looked back at the Ornish and Blackburn study I discussed a couple weeks ago (see here), as well as a few other studies I had run across. I was interested in seeing how well the practice was described and whether it made in sense.

I was surprised to find that the most high profile of these studies, the 2008 Ornish and Blackburn study (see here), had the least detail. What they described as yoga for stress management consisted of “gentle yoga-based stretching, breathing, meditation, imagery, and progressive relaxation techniques 60 min/day, 6 days/week”. In contrast, a study published this summer by Dr. Fishman on osteoporosis and yoga (see here ) was considerably more comprehensive, listing all 10 yoga poses by both Anglicized and Indian names, e.g., “Upward and Downward Dog poses (Adho Mukha Svanasana and Urdhva Mukha Svanasana),” as well providing an appendix of 13 figures illustrating each poses. It should be pointed out that the lead author of this study was extremely familiar with yoga, having practiced it in India for three before attending medical school.

Another group that was fairly thorough in their description was Sherman et al. which just appeared on-line a couple days ago (see here) in their study of chronic low back pain, where they describe a viniyoga practice consisting of 5-11 poses (with pictorial diagrams referenced from earlier 2005 paper by this same group (see here). Interestingly, these authors also provided the credential for the teachers as “instructors with at least 500 hours of viniyoga training, 5 years of teaching experience, and familiarity with the selected postures and who were briefed by our yoga consultant.” This paper also gave a defense of their yoga style (viniyoga), as “a therapeutically oriented style of yoga that emphasizes safety and is relatively easy to learn.” 

Iyengar-style yoga was used in another study examining stress and inflammation by Kiecolt-Glaser, et al (see here) because it ”emphasizes the use of props to help students achieve precise postures safely and comfortably according to their particular body types and need”. In this latter study, the 12 poses and timing of each were well described and was constant, and apparently selected “based on their purported relationship to immune function and/or restorative effects.”

Obviously not everyone is going to agree with what is a good or best yoga practice for stress, back pain, osteoporosis or whatever. But what is clear is that these studies need to provide a through description of the regimen (time, poses, teacher qualifications) and their overall rationale, so that if someone wanted to reproduce this study or compare it with another, they shouldn’t be in the dark as to what the yoga practice was. In the end, it’s you who is going to have to decide on what to believe, as the standards for comparing these practices, pose sequences, and yoga styles are confusing at best. Maybe Nina and Baxter can comment on this, as I’m not an expert.